
Have you ever stood at the edge of the Grand Canyon and felt completely overwhelmed by its sheer magnificence? You’re not alone. This geological masterpiece has been inspiring photographers for over a century, and it’s easy to see why. The Grand Canyon offers some of the most spectacular photo opportunities in the world, but capturing its true essence requires more than just pointing and shooting.
Whether you’re a seasoned photographer or someone who just loves taking pictures with your smartphone, this guide will help you create Grand Canyon National Park photos that truly capture the wonder of this natural phenomenon. We’ll explore the best locations, optimal timing, essential techniques, and insider tips that will transform your canyon photography from ordinary snapshots into extraordinary memories.
Why Grand Canyon National Park Photos Are Simply Breathtaking
The Grand Canyon isn’t just another pretty landscape – it’s a photographer’s dream come true. But what makes Grand Canyon National Park photos so captivating? The answer lies in the perfect storm of geological wonder, dramatic lighting, and sheer scale that creates endless opportunities for stunning imagery.
The Geological Wonder That Captivates Photographers
Think of the Grand Canyon as nature’s own art gallery, carved over millions of years by the Colorado River. Each layer of rock tells a story spanning nearly two billion years of Earth’s history. When you photograph the canyon, you’re not just capturing a landscape – you’re documenting a timeline of our planet’s evolution.
The canyon’s distinctive layers create natural leading lines that draw the eye deeper into the frame. These horizontal bands of red, orange, yellow, and purple rock formations provide incredible texture and depth that make every photo feel three-dimensional. The contrast between the ancient rock formations and the ever-changing sky creates a dynamic composition that’s impossible to ignore.
Colors That Change With Every Hour
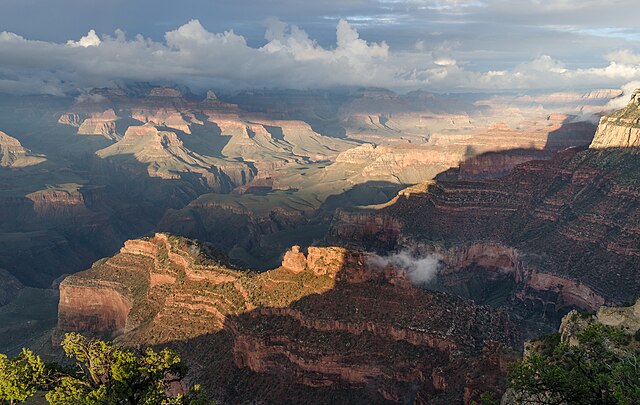
If you think the Grand Canyon looks the same all day, think again! The canyon’s colors shift dramatically throughout the day, creating completely different moods and atmospheres. During the harsh midday sun, the canyon might appear washed out and flat. But as the sun begins its descent, magic happens.
The warm light of golden hour transforms the red rocks into glowing embers, while the deep shadows create mysterious depths. Blue hour brings out the canyon’s more subtle hues – purples, blues, and soft pinks that most visitors never see. This constant transformation means you could photograph the same viewpoint at different times and create entirely unique images each time.
Best Times to Take Grand Canyon National Park Photos
Timing is everything when it comes to Grand Canyon photography. The difference between a mediocre photo and a stunning masterpiece often comes down to when you press the shutter button. Understanding the canyon’s lighting patterns will dramatically improve your results.
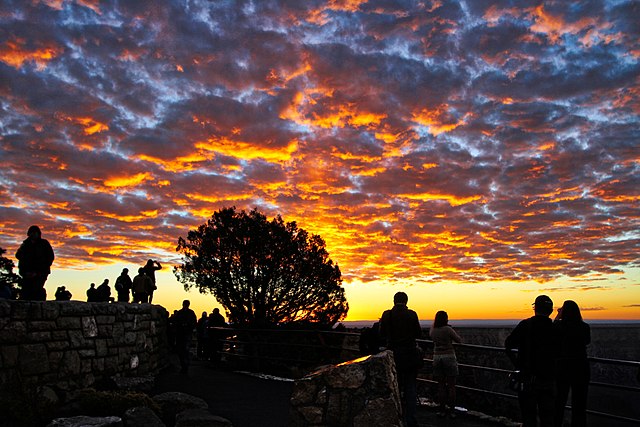
Golden Hour Magic: Sunrise and Sunset Photography
Golden hour – that magical time just after sunrise and before sunset – is when the Grand Canyon truly comes alive. The warm, directional light during these periods creates incredible contrast and brings out the rich colors in the rock formations. But here’s the thing: golden hour at the Grand Canyon isn’t just about pretty colors.
Sunrise offers a completely different experience than sunset. Morning light tends to be cooler and clearer, perfect for capturing sharp details and vibrant colors. The canyon walls catch the first rays of sunlight, creating a gentle glow that gradually spreads across the landscape. Sunset, on the other hand, provides warmer, more dramatic light that can create silhouettes and bold contrasts.
The key is positioning yourself at the right viewpoint. For sunrise, east-facing viewpoints like Mather Point or Yaki Point offer spectacular views as the sun illuminates the canyon walls. For sunset, west-facing locations like Hopi Point or Hermit’s Rest provide the best vantage points to capture the day’s final light show.
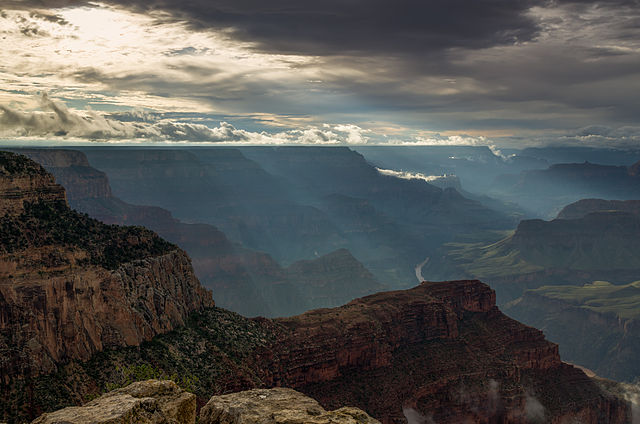
Blue Hour: Capturing the Canyon’s Mystical Mood
Don’t pack up your camera when the sun disappears! Blue hour – the period just after sunset when the sky takes on a deep blue color – offers some of the most atmospheric Grand Canyon photos you’ll ever take. During this time, the canyon walls retain some of the day’s warmth while the sky provides a stunning contrast.
Blue hour is perfect for capturing the canyon’s more mysterious side. The soft, even lighting eliminates harsh shadows and creates a dreamy, ethereal quality. This is also an excellent time to experiment with longer exposures, especially if you want to capture star trails or the Milky Way above the canyon.
Seasonal Considerations for Photography
Each season brings its own photographic opportunities to the Grand Canyon. Spring offers wildflowers and pleasant temperatures, making it ideal for hiking to remote viewpoints. Summer provides the longest days and warmest weather, but also brings crowds and harsh midday light.
Fall is arguably the best time for photography, with cooler temperatures, fewer crowds, and crisp, clear air that enhances visibility. Winter transforms the canyon into a completely different landscape, with snow-capped rims and dramatic storm clouds providing unique photo opportunities. However, winter also brings unpredictable weather and limited access to some viewpoints.
Top Photography Locations in Grand Canyon National Park
Not all viewpoints are created equal when it comes to photography. Some locations offer classic, postcard-perfect views, while others provide unique perspectives that will make your photos stand out from the crowd. Let’s explore the best spots for capturing stunning Grand Canyon National Park photos.
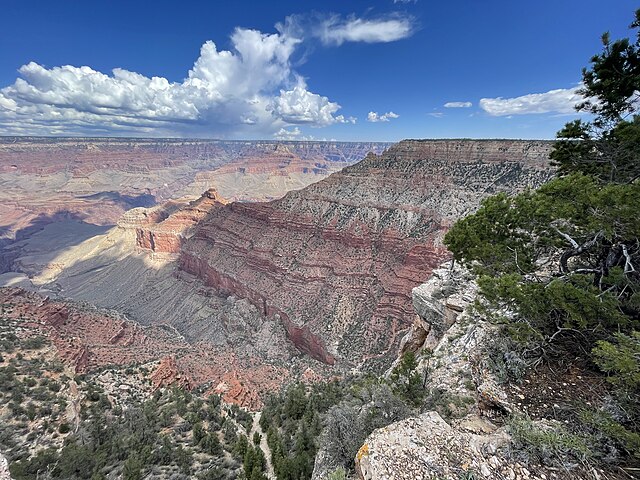
South Rim: The Classic Viewpoints
The South Rim is open year-round and offers the most accessible photography locations. It’s where most visitors get their first glimpse of the canyon, and for good reason – the views are absolutely spectacular. The South Rim provides classic Grand Canyon vistas that showcase the canyon’s full depth and grandeur.
Mather Point: Perfect for Beginners
Mather Point is often the first stop for many visitors, and it’s an excellent choice for photographers of all skill levels. Located near the visitor center, this viewpoint offers panoramic views of the canyon and is easily accessible via a short, paved trail. The point provides multiple vantage points, allowing you to experiment with different compositions.
What makes Mather Point special is its eastern exposure, making it ideal for sunrise photography. The point juts out into the canyon, providing 180-degree views that include both the central canyon and the eastern reaches. The rock formations below create natural leading lines, while the layered canyon walls provide incredible depth and texture.
Yavapai Point: Geological Museum Views
Yavapai Point combines spectacular views with educational opportunities. The Yavapai Geology Museum sits right on the rim, offering both indoor and outdoor photography opportunities. The point provides excellent views of the central canyon and the Colorado River below.
This location is particularly valuable for photographers interested in geological formations. The museum’s exhibits help you understand what you’re photographing, adding context to your images. The point also offers some of the best views of the canyon’s rock layers, making it ideal for capturing the geological story of the Grand Canyon.
Hopi Point: Sunset Spectacular
Hopi Point is widely considered one of the best sunset viewing locations on the South Rim. The point faces west, providing unobstructed views of the setting sun as it disappears behind the canyon walls. The dramatic lighting during sunset creates incredible opportunities for silhouette photography and captures the canyon’s most vibrant colors.
The point can get crowded during peak sunset hours, so arrive early to secure a good spot. The elevated position provides commanding views of the canyon, and the multiple rock outcroppings below create interesting foreground elements for your compositions.
North Rim: The Road Less Traveled
The North Rim offers a completely different perspective of the Grand Canyon. Open only from mid-May to October due to snow, the North Rim provides a more secluded and intimate experience. The elevation is higher than the South Rim, offering cooler temperatures and different vegetation that creates unique photographic opportunities.
Bright Angel Point: Dramatic Perspectives
Bright Angel Point provides some of the most dramatic and intimate views of the canyon. The point extends far into the canyon, offering 270-degree views that include close-up details of the canyon walls as well as distant vistas. The perspective from this point creates a sense of being surrounded by the canyon rather than simply looking into it.
The point is accessible via a short, easy trail from the North Rim Lodge. The trail itself offers multiple photography opportunities, with different viewpoints providing varying perspectives of the canyon. The point is particularly stunning during sunrise, when the eastern walls catch the first light of day.
Point Imperial: Highest Viewpoint
At 8,803 feet, Point Imperial is the highest viewpoint in Grand Canyon National Park. The elevation provides expansive views that extend far beyond the canyon itself, including the Painted Desert and the Colorado River. The point offers a unique perspective that showcases the canyon’s place in the larger landscape.
The drive to Point Imperial is scenic in itself, winding through aspen and pine forests that provide additional photography opportunities. The point is particularly spectacular during fall when the aspen trees turn golden, creating a beautiful contrast with the red canyon walls.
Essential Camera Settings for Grand Canyon Photography
Understanding your camera settings is crucial for capturing the best possible Grand Canyon photos. The canyon’s extreme contrasts between bright sky and dark shadows can challenge even experienced photographers. Here’s how to master your camera settings for Grand Canyon photography.
Mastering Exposure in Challenging Light
The Grand Canyon presents unique exposure challenges that can frustrate even experienced photographers. The bright sky and dark canyon create extreme contrast that can fool your camera’s meter. Understanding how to handle these challenging lighting conditions is essential for creating well-exposed images.
Start by using your camera’s histogram rather than just the LCD screen to judge exposure. The histogram shows you the actual distribution of light and dark tones in your image. For Grand Canyon photography, you want to avoid clipping highlights (pure white areas with no detail) while retaining detail in the shadows.
Consider using exposure bracketing to capture multiple exposures of the same scene. This technique involves taking several shots at different exposure settings, ensuring you capture detail in both the highlights and shadows. You can then blend these exposures in post-processing or simply choose the best single exposure.
Depth of Field Considerations
Depth of field – the range of distance that appears sharp in your photo – is crucial for Grand Canyon photography. The canyon’s incredible depth and scale require careful consideration of your aperture settings to ensure both foreground and background elements are in focus.
For landscape photography at the Grand Canyon, you’ll typically want to use a smaller aperture (higher f-number) like f/8 to f/11 to maximize depth of field. This ensures that both the rim rocks in the foreground and the distant canyon walls remain sharp. However, don’t automatically assume smaller is always better – apertures smaller than f/11 can actually reduce sharpness due to diffraction.
Consider the hyperfocal distance – the closest distance at which you can focus while keeping objects at infinity acceptably sharp. For Grand Canyon photography, focusing at the hyperfocal distance ensures maximum sharpness from foreground to background.
Using Filters to Enhance Your Photos
Filters can dramatically improve your Grand Canyon photography by helping you manage the extreme contrast and enhance colors. A polarizing filter can reduce reflections and increase color saturation, making the red rocks appear more vibrant and the sky more dramatic.
Neutral density (ND) filters are invaluable for Grand Canyon photography, especially during bright daylight hours. These filters reduce the amount of light entering your camera, allowing you to use slower shutter speeds or wider apertures. This is particularly useful for creating smooth, flowing water effects if you’re photographing the Colorado River or for capturing cloud movement.
Graduated neutral density filters are specifically designed for landscapes with bright skies and darker foregrounds – exactly what you encounter at the Grand Canyon. These filters darken the sky portion of your image while leaving the canyon unaffected, helping you achieve balanced exposures.
Composition Techniques for Stunning Grand Canyon Photos
Great Grand Canyon photography goes beyond just good exposure and sharp focus. Composition – how you arrange elements within your frame – can make the difference between a snapshot and a work of art. Let’s explore the composition techniques that will elevate your Grand Canyon photos.
Rule of Thirds and Leading Lines
The rule of thirds is a fundamental composition technique that works exceptionally well for Grand Canyon photography. Instead of placing the horizon line in the center of your frame, try positioning it along the upper or lower third line. This creates a more dynamic and visually interesting composition.
The canyon’s natural rock formations create incredible leading lines that draw the viewer’s eye into the image. Look for ridges, rock layers, and the canyon’s rim that can serve as leading lines. The Colorado River, when visible, provides a powerful leading line that guides the eye through the canyon’s depths.
Combine the rule of thirds with leading lines for maximum impact. Place your main subject – perhaps a distinctive rock formation or the river – at one of the intersection points where the third lines meet, then use natural lines to guide the viewer’s eye to that point.
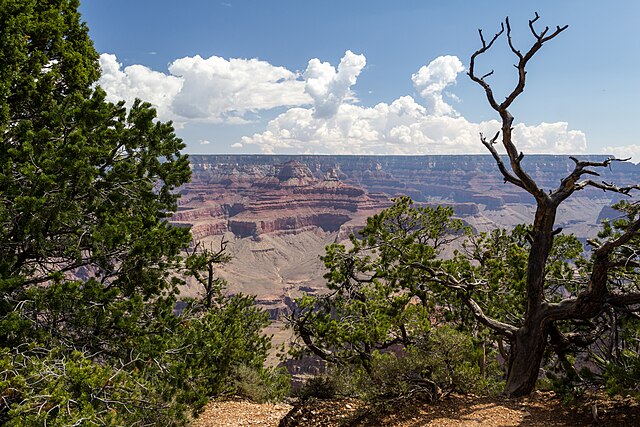
Foreground Elements That Make Photos Pop
One of the biggest mistakes photographers make at the Grand Canyon is focusing only on the distant views. Including interesting foreground elements can transform your photos from ordinary to extraordinary. Foreground elements add depth, context, and visual interest to your compositions.
Look for distinctive rocks, twisted trees, or interesting vegetation that can serve as foreground elements. Desert plants like agave or prickly pear cactus can add texture and context to your images. Dead trees, sculpted by wind and weather, can create dramatic silhouettes against the canyon backdrop.
The key is to find foreground elements that complement rather than compete with the canyon views. Your foreground should enhance the overall composition and help tell the story of this incredible landscape.
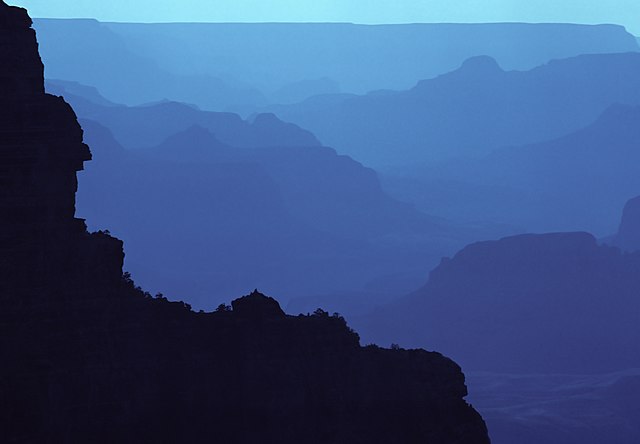
Capturing Scale and Depth
The Grand Canyon’s immense scale can be difficult to convey in photographs. Without proper techniques, even the most spectacular views can appear flat and uninspiring. Learning to capture the canyon’s true scale and depth is essential for creating impactful images.
Include human elements when possible to provide scale reference. A hiker silhouetted against the canyon rim or a person standing at a viewpoint can help viewers understand the canyon’s true magnitude. However, be mindful of privacy and always ask permission before photographing people.
Use overlapping elements to create a sense of depth. Layer different rock formations, ridges, and distant mesas to build depth in your composition. This technique helps viewers understand the three-dimensional nature of the canyon that’s difficult to convey in a two-dimensional photograph.
Wildlife Photography Opportunities
While the Grand Canyon is primarily known for its geological wonders, it’s also home to diverse wildlife that provides excellent photography opportunities. From soaring condors to elusive desert bighorn sheep, the canyon ecosystem offers chances to capture incredible wildlife images.
Desert Animals and Their Habitats
The Grand Canyon’s desert environment supports a surprising variety of wildlife. Elk are commonly seen along the South Rim, particularly during early morning and evening hours. These majestic animals provide excellent photography opportunities, especially during the fall rutting season when males display impressive antlers.
Mule deer are another common sight, often grazing near viewpoints and along trails. Their alert nature and graceful movements make them ideal subjects for wildlife photography. The key to photographing these animals is patience and respect – maintain a safe distance and use a telephoto lens to capture intimate portraits without disturbing them.
Desert bighorn sheep are less common but provide some of the most rewarding wildlife photography opportunities. These agile animals navigate the canyon’s steep terrain with ease, often posing dramatically against the canyon backdrop. They’re most active during cooler parts of the day, so early morning and late afternoon offer the best chances for sightings.
Bird Photography at the Canyon
The Grand Canyon is a paradise for bird photographers, with over 370 species recorded in the park. The California condor, one of the world’s rarest birds, can often be seen soaring above the canyon. These massive birds with their 10-foot wingspan create incredible silhouettes against the canyon sky.
Ravens are common throughout the park and make excellent subjects for behavioral photography. Their intelligence and playful nature provide opportunities to capture interesting interactions and expressions. They’re particularly active during the early morning hours and often pose cooperatively for photographers.
Peregrine falcons nest on the canyon walls and provide spectacular flight photography opportunities. These fastest birds in the world can be seen diving at incredible speeds, creating dramatic action shots against the canyon backdrop.
Planning Your Grand Canyon Photography Trip
Successful Grand Canyon photography requires careful planning. From understanding weather patterns to knowing what equipment to bring, proper preparation can make the difference between a frustrating trip and a successful photo adventure.
What to Pack for Your Photo Adventure
Your camera gear is obviously essential, but Grand Canyon photography requires some specific equipment considerations. A sturdy tripod is absolutely crucial for sharp landscape images, especially during low-light conditions at sunrise and sunset. The canyon’s windy conditions can make handheld photography challenging, so invest in a quality tripod that can withstand desert winds.
Bring extra batteries and memory cards – the canyon’s inspiring views will have you taking far more photos than you initially planned. Cold weather can drain batteries quickly, so keep spares warm in an inside pocket. A headlamp or flashlight is essential for navigating to viewpoints in the dark for sunrise photography.
Sun protection is crucial in the desert environment. Bring sunscreen, a wide-brimmed hat, and plenty of water. The high elevation and reflective canyon walls can create intense sun exposure that can quickly lead to sunburn or dehydration.
Permits and Regulations for Photographers
Most photography at Grand Canyon National Park can be done without special permits, but there are important regulations to understand. Commercial photography and large group photo shoots may require permits, so check with the park service if you’re planning anything beyond personal photography.
Drone photography is heavily regulated in national parks. Currently, drones are not permitted in Grand Canyon National Park except for specific authorized research purposes. This restriction helps protect wildlife and preserve the natural quiet of the canyon environment.
Be aware of areas where photography may be restricted or culturally sensitive. Some viewpoints may have specific rules about tripod placement or group size. Always respect barriers and designated areas – they’re there for both safety and resource protection.
Post-Processing Tips for Grand Canyon Photos
Taking the photo is only half the battle. Post-processing can transform good Grand Canyon photos into stunning works of art. Understanding how to enhance your images while maintaining their natural beauty is key to creating compelling final results.
Enhancing Colors and Contrast
The Grand Canyon’s natural colors are spectacular, but camera sensors don’t always capture them exactly as your eyes see them. Careful post-processing can restore and enhance these colors without creating an artificial look. Start with basic adjustments to exposure, contrast, and vibrance to bring out the canyon’s natural beauty.
Pay special attention to the canyon’s warm tones – the reds, oranges, and yellows that make the rock formations so striking. Selective color adjustments can help enhance these warm tones while maintaining natural skin tones if people are in your photos. Avoid over-saturation, which can make your images look artificial and unappealing.
The canyon’s layered rock formations benefit from careful contrast adjustments. Increase contrast to make the layers more distinct, but be careful not to lose detail in the shadows or highlights. Local adjustments using masks can help you fine-tune different areas of your image independently.
Dealing with Harsh Lighting Conditions
The Grand Canyon’s extreme lighting conditions often result in images with blown-out highlights or blocked-up shadows. Post-processing techniques can help recover detail in these challenging areas and create more balanced, appealing images.
Use the highlights and shadows sliders to recover detail in overexposed skies and underexposed canyon walls. Modern RAW processing software provides remarkable ability to recover detail that might seem lost in the original image. However, be careful not to over-adjust these settings, which can create an unnatural, flat appearance.
Consider using luminosity masks or other advanced selection techniques to make precise adjustments to specific tonal ranges. This allows you to brighten shadow areas without affecting highlights, or darken bright skies without impacting the canyon walls.
Sharing Your Grand Canyon National Park Photos
Once you’ve captured and processed your Grand Canyon photos, sharing them effectively can help others appreciate this incredible landscape while potentially building your photography portfolio. Understanding the best practices for sharing your work can maximize its impact.
Social Media Best Practices
Social media platforms like Instagram, Facebook, and Twitter are popular ways to share your Grand Canyon photos, but each platform has specific requirements and best practices. Instagram’s square format works well for certain canyon compositions, while its newer vertical format is perfect for showing the canyon’s depth and scale.
Use relevant hashtags to help people discover your photos. Popular Grand Canyon hashtags include #GrandCanyon, #GrandCanyonNationalPark, #Arizona, and #NationalPark. However, don’t overdo it – a few well-chosen hashtags are more effective than dozens of generic ones.
Consider the story behind your photos when writing captions. Share details about the location, the time of day, or the challenges you faced getting the shot. People love hearing the story behind great photographs, and it can help them appreciate the effort that went into creating the image.
Creating Lasting Memories
While digital sharing is popular, don’t forget about creating physical prints of your best Grand Canyon photos. The canyon’s incredible detail and color depth really shine in high-quality prints. Consider printing on metal or canvas for a modern look, or traditional fiber-based papers for a classic feel.
Create a photo book or album of your Grand Canyon adventure. This physical memento can become a treasured family heirloom and a way to share your experience with others. Include location details, technical information, and personal reflections to make it a complete record of your photographic journey.
Consider entering your best Grand Canyon photos in photography competitions or submitting them to photography magazines. The canyon is a popular subject, so your images need to be truly exceptional to stand out, but the recognition can be rewarding for both personal satisfaction and professional development.
Conclusion
The Grand Canyon offers some of the most spectacular photography opportunities in the world, but capturing its true magnificence requires more than just showing up with a camera. Success comes from understanding the canyon’s unique lighting conditions, knowing the best locations for different types of shots, and mastering the technical skills needed to handle challenging exposures.
Remember that great Grand Canyon photography is about more than just technical perfection – it’s about capturing the emotion and wonder that this incredible landscape inspires. Whether you’re shooting with a smartphone or professional camera equipment, the key is to slow down, observe the light, and wait for those magical moments when everything comes together.
The Grand Canyon has been inspiring photographers for generations, and it will continue to do so for generations to come. Each visit offers new opportunities to see this geological wonder in different light, different seasons, and different weather conditions. Your Grand Canyon National Park photos are not just images – they’re your personal interpretation of one of Earth’s most magnificent landscapes.
So pack your camera, plan your trip, and prepare to be amazed. The Grand Canyon is waiting to be captured through your unique perspective, and with the techniques and tips in this guide, you’ll be ready to create images that truly do justice to this natural wonder.
Frequently Asked Questions
Q: What’s the best camera for Grand Canyon photography?
A: Any camera can capture great Grand Canyon photos, from smartphones to professional DSLRs. The key is understanding your camera’s capabilities and limitations. DSLRs and mirrorless cameras offer more control over settings and better low-light performance, but modern smartphones can produce excellent results, especially in good lighting conditions.
Q: Do I need special permits to photograph at Grand Canyon National Park?
A: Personal photography doesn’t require permits, but commercial photography, large group shoots, and certain professional activities may need special authorization. Drone photography is currently prohibited in the park. Always check current regulations with the National Park Service before your visit.
Q: What’s the best time of year to visit for photography?
A: Fall (September-November) is often considered the best time for Grand Canyon photography, offering clear skies, comfortable temperatures, and fewer crowds. Spring (March-May) is also excellent, with wildflowers and pleasant weather. Summer provides the longest days but can be hot and crowded. Winter offers unique snow scenes but unpredictable weather.
Q: How can I avoid crowds when photographing popular viewpoints?
A: Arrive early for sunrise shots or stay late for sunset photography when crowds are smaller. Consider visiting during off-peak seasons (late fall, winter, early spring) or exploring less popular viewpoints. Weekdays are typically less crowded than weekends, especially during peak tourist season.
Q: What safety considerations should I keep in mind while photographing at the Grand Canyon?
A: Always stay behind barriers and on designated trails – the canyon’s edges can be unstable and dangerous. Bring plenty of water and sun protection, especially during summer months. Let someone know your photography plans and expected return time. Be aware of changing weather conditions, particularly during monsoon season when flash floods can occur.